The v4 API is deprecatedThe v4 (Contact Tracking) API is deprecated and will be sunset on June 15, 2027. Please follow the migration guide to move to the latest stable Omnisend API version.
v4 API Deprecation Notice
What this means
- The v4 API is deprecated and will receive no new features or improvements. Do not use it for new projects.
- All v4 endpoints will continue to work until June 15, 2027, after which they may be shut down.
- All v4 functionality is available in the latest stable Omnisend API version.
Migrating to the latest stable version
Please follow the migration guide — it covers authentication and maps every v4 endpoint to its replacement:
POST /v4/identifyandGET /v4/contacts/...→ the Contacts APIPOST /v4/track→ the Events API
Contacting Support
If you need help migrating from v4, please contact our support team at [email protected].
General information
We will walk you through the steps needed to get started including app submission, authentication and some sample requests to our API.
Before jumping to the steps, we would like to highlight which resources can be reached via our API:
- Contacts - identify/create, get details
- Events - track any event around the contact (e.g., "page viewed", "product ordered", etc)
Ok, lets get started!
Registering your app
First, you'll need to register your application. Go to Partners Portal and submit a form.
The most important part here is a Authorization callback URL where the auth code will be delivered after the successful user authorization.
After sending us all the required data, we will reach you out with app details such as unique Client ID and Secret. The Client Secret should not be shared!
Now you are ready to build your integration!
Authentication
As you probably already noticed from the previous step, our API is secured with OAuth 2.0. Meaning that your app must implement Authorization Code Grant flow standard in order to get access tokens on behalf of users.
1. Generating an auth request
Now you have to generate Authorization request with these query parameters:
| Query parameter | Description |
|---|---|
response_type | Authorization code grant type. Always pass code. |
client_id | Your OAuth client id. |
redirect_uri | URL where user will be redirected with generated auth code. |
scopes | The resources your app is willing to access. Values separated by spaces. They are defined for each endpoint in our API documentation. |
state | Randomly generated, unique per request value used by your app to maintain state between request and callback. More info: "state" Parameter. |
E.g.:
GET https://app.omnisend.com/oauth2/authorize?client_id=YOUR_CLIENT_ID
&redirect_uri=REDIRECT_URI
&response_type=code
&state=RANDOMLY_GENERATED_VALUE
&scope=RESOURCEX%20RESOURCEY
If a user is not logged in, she/he will be redirected to do that. After logging in, consent page will be shown.
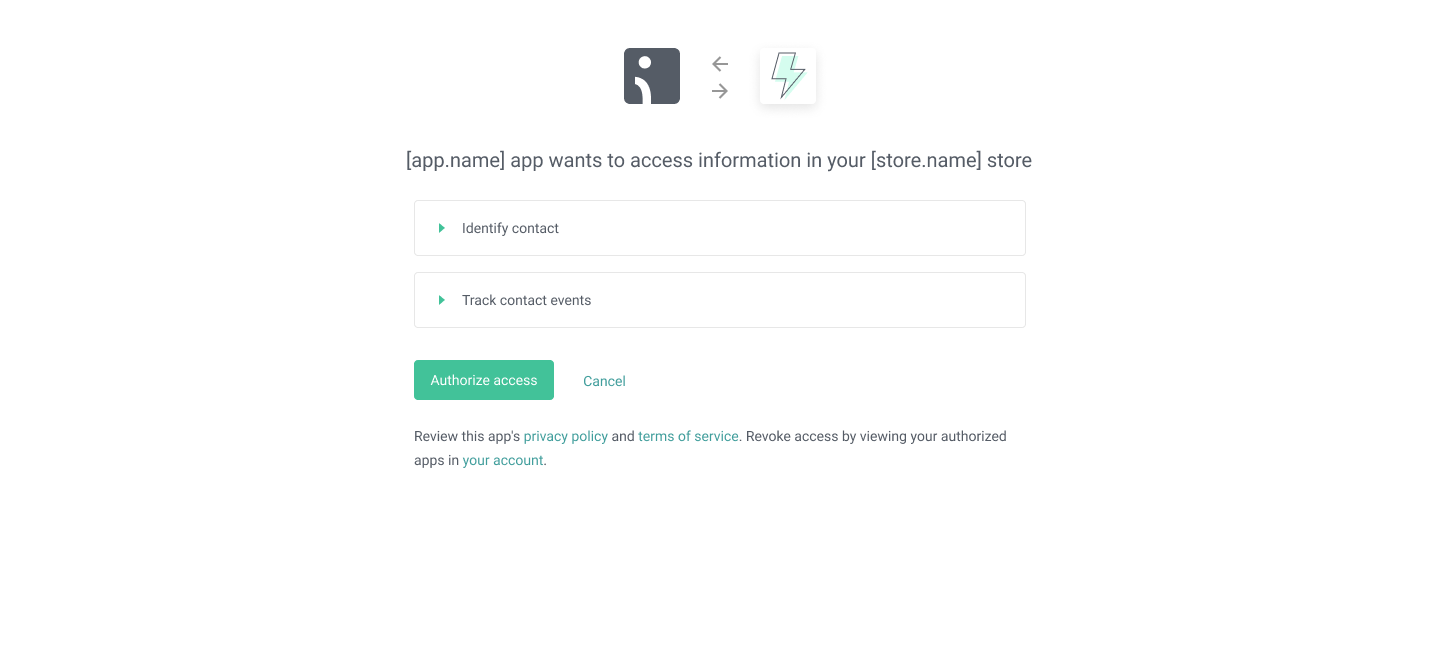
Here the user will need to give an approval for the app to access particular resources on behalf of her/him. Continuing the flow brings the user to the next step.
2. Accepting user authorization
Do you remember the Authorization callback URL specified during app submission? The user will now be redirected to that URL, and you are responsible for taking care of the auth code provided in query parameters.
E.g., of the callback:
http://localhost:6000/?code=6O-KEB2KNCWKT7YVFYTF9G&state=adxcsasdcqwsYou must parse the code and proceed to the next step.
3. Getting an access token
With the code from previous step you need to generate a POST request to exchange the code to an access token.
| Body parameters | Description |
|---|---|
code | The code parsed from the URL |
grant_type | Always must be authorization_code |
client_id | Your OAuth client id |
client_secret | Your OAuth client secret |
redirect_uri | Same redirect URI used in the step 2 |
E.g.:
POST https://app.omnisend.com/oauth2/token
Content-Type: application/x-www-form-urlencoded

client_id=YOUR_CLIENT_ID
&client_secret=YOUR_CLIENT_SECRET
&grant_type=authorization_code
&code=AUTH_CODE
&redirect_uri=REDIRECT_URI
You will get a similar response:
{
  "access_token": "RANDOMLY_GENERATED_ACCESS_TOKEN",
  "expires_in": 9223372036,
  "refresh_token": "RANDOMLY_GENERATED_REFRESH_TOKEN",
  "scope": "RESOURCEX RESOURCEY",
  "token_type": "Bearer"
}
That's it! You now have an access token for requested resources for the particular user. Keep it as long as you need, because it will never expire (unless the user will decide to revoke it).
Making a request to the API
With an access token you can start calling our API and interact with resources (such as Contacts, Events, etc).
Here is a sample request to get a contact by provided email:
GET https://api.omnisend.com/v4/contacts/email:[email protected]
Content-Type: application/json
Authorization: Bearer RANDOMLY_GENERATED_ACCESS_TOKEN
As you got familiar with the authentication and actual requests to our API, you can now start exploring other endpoints.
P.S. If you have any feedback, or you are missing some important information, please contact us via [email protected].