How to: connect the store
This guide will walk you through the process of connecting your e-commerce platform to Omnisend.
Here is the visualisation of the flow:
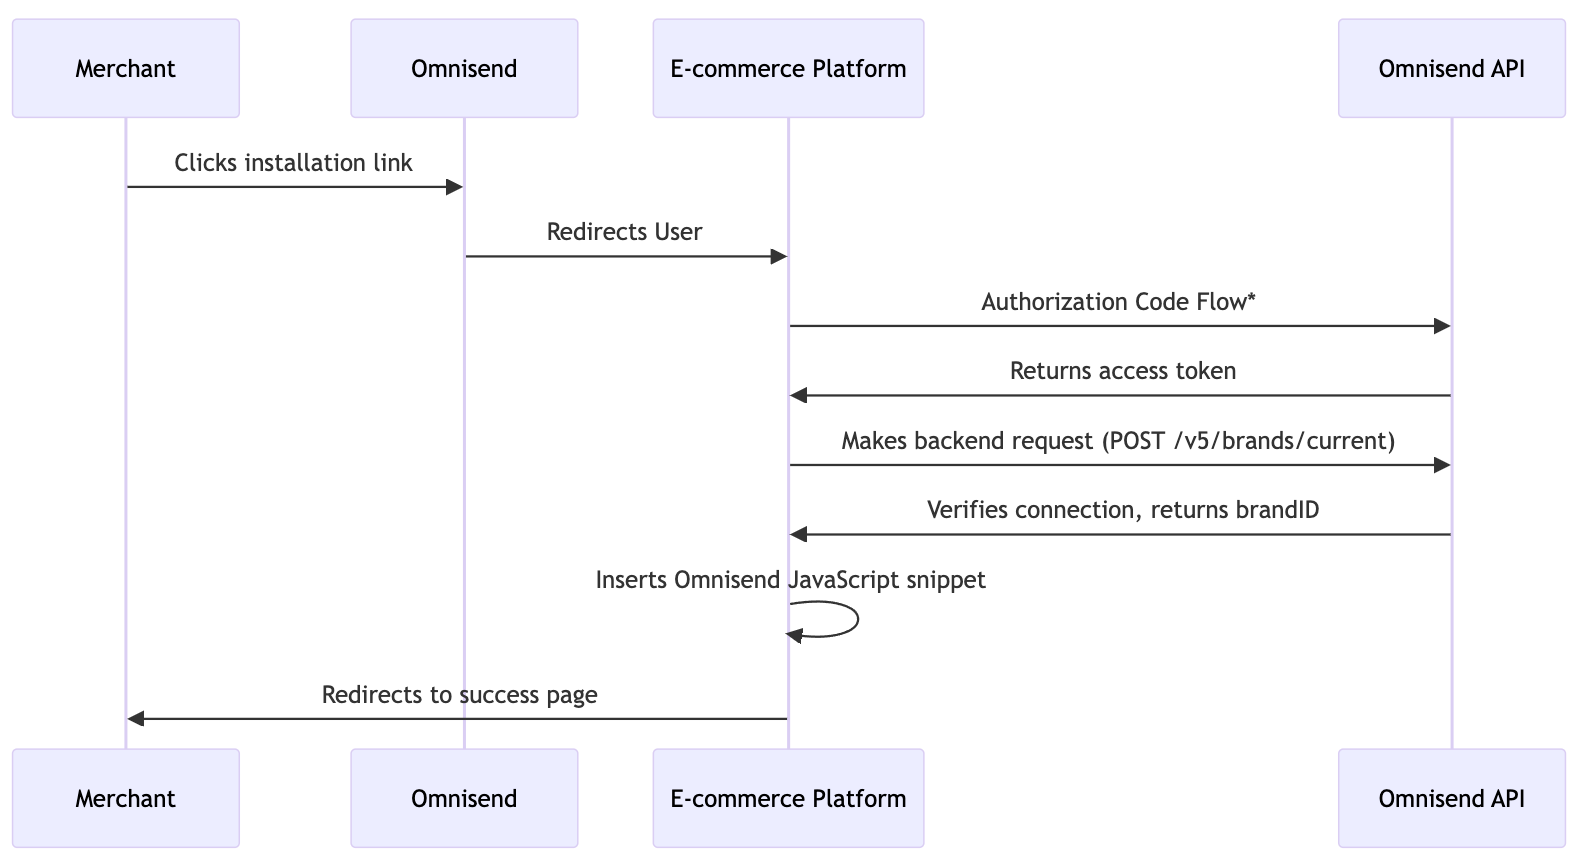
1. Merchant initiates store connection by clicking installation link
When a merchant seeks to integrate Omnisend with their store on your platform, they are directed to a page containing detailed instructions along with a link for installation. This process requires no development effort on your part.
2. Initiate Authorization code flow and retrieve access token
Your task in this step is to initiate the OAuth flow by redirecting the merchant to Omnisend's OAuth endpoint.
Here is detailed information on how to do that: OAuth
3. Connect the store
To connect the store, you have to send a POST request to the POST /brands/current endpoint. Here is an example:
curl --request POST \
     --url https://api.omnisend.com/v5/brands/current \
     --header 'Authorization: Bearer {ACCESS_TOKEN}' \
     --data '
{
  "website" : "https://demo.platform.com/",
  "platform" : "platform",
  "version" : "1.0",
  "currency" : "USD"
}
'
Here Omnisend expects :
- Merchant's store
website platformname. Please contact us via [email protected], so we can enable your platform in our system.- Integration
version(we suggest adopting Simplified Semantic Versioning) - Store's
currency
Upon request submission, you should receive a response containing a brandID:
{
  "brandID": "64414b8d242d4daeb00ae021"
}
If everything went well, you will receive a brandID which you will need in the next step to add the JS snippet to the Merchant's store.
4. Add JS snippet for customer tracking [recommended]
By enabling customer tracking, Merchants using your platform should get following benefits:
- Automatic collection of
**viewed page**events: The snippet tracks customer browsing activity, which allows the activation of "Browse Abandonment" automations. These automations re-engage customers who have visited the Merchant's store but have not made a purchase. - Tracking
**viewed product**events: The snippet allows you to send these events to Omnisend. This data can be used to create "Product Abandonment" automations, targeting customers who have viewed specific products without completing a purchase. - Tracking cart-related events: The JavaScript snippet allows you to capture essential customer interactions with their cart, such as adding a product and starting the checkout process. This data is crucial for enabling "Cart Abandonment" automations and refining customer segmentation.
All those actions will allow to personalize and automate communication with Customers via Omnisend's build-in capabilities.
<script type="text/javascript">
    //OMNISEND-SNIPPET-SOURCE-CODE-V1
    window.omnisend = window.omnisend || [];
    omnisend.push(["brandID", "<BRAND_ID>"]);
    omnisend.push(["track", "$pageViewed"]);
    !function(){var e=document.createElement("script");e.type="text/javascript",e.async=!0,e.src="https://omnisnippet1.com/inshop/launcher-v2.js";var t=document.getElementsByTagName("script")[0];t.parentNode.insertBefore(e,t)}();
</script>
Replace <BRAND_ID> with brandID which you got in the previous step and insert this snippet into store's HTML code, preferably before the closing </body> tag. This ensures it is loaded on every page of the Merchant's store.
Keep in mind that in order to track customers you firstly need to identify them.
And that's it! You have successfully connected the store to Omnisend.